- Information
- AI Chat
2A titrations - A detailed unit2 assignment a
Chemistry
Sixth Form (A Levels)
• A2 - A Level
Recommended for you


Preview text
4/24/ BTEC: APPLIED SCIENCE UNIT 2 ASSIGNMENT A
Unit 2: Practical Scientific Procedures and Techniques
Concentrate on keeping up your standards
Learning aim:
A: Undertake titration and colorimetry to determine the concentration of solutions.
Introduction
Titration is a method where a solution of known concentration is used to determine a concentration of an unknown solution. Calibration maintains the accuracy, so methods could be repeated. The knowns concentrations are also known as the standard solution. The known concentration is used to prove the correct calculations.
Neutralisation is a process where an acid and alkali are combined to make a neutral solution. The protons are transferred from the acid so it will produce a salt and a water. The neutralisation equation is 2 H2(g) + O2(g) ==> 2H 2 O(l) + energy 1 (Doc Brown’s, 2000). When acids are added to water, they form positively charged hydrogen ions (H+). By adding hydrogen ions, it makes a solution more acidic. When alkalis are added to water (H2O) they form negative hydroxide ions which is also known as OH-. The pH scale numerical scale is also used to tell how acidic or alkali a solution is. When neutralisation happens, it makes the reaction move towards pH 7. We can use the equation molarity (M) of the acid x volume (V) of the acid = molarity (M) of the base x volume (V) of the base. The pH level for neutralisation is 7, which is also the colour green.
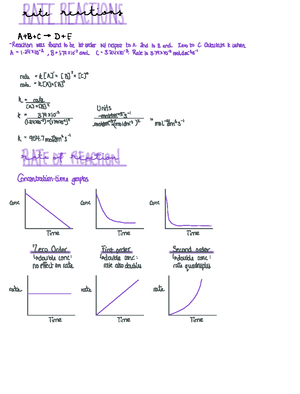
The titration results can also be analysed with a titration curve where the pH changes in the titrated solution, as the number of moles added from the burette. 2
The strength of the acid describes acid molecules that ionise whilst concentration describes the number of acid molecules per volume of solvent. A strong alkali is fully ionised in water to produce a high concentration of hydroxide ions, while a weak alkali which only will ionise partially in water will produce a low concentration of hydroxide ions.
The measure of the strength for phenolphthalein is 9 pK. The basic form colour is pink. 3
1 Equation taken - docbrown/page07/equilibria5f.htm 2 Information taken - umb.edu/photo/pliki/WF_jednostki/zaklad-chemii- medycznej/english_division/laboratory_3 3 Measure of strength - umb.edu/photo/pliki/WF_jednostki/zaklad-chemii- medycznej/english_division/laboratory_3
4/24/ BTEC: APPLIED SCIENCE UNIT 2 ASSIGNMENT A
Calibrations
Calibration is a process to configure an instrument to provide a result within an acceptable range. We use a volumetric pipette to put an accurate volume of reactant in the conical flask, this allows us to measure a known volume in an accurate way. Weighing scale calibration is a set of processes which we measure under controlled conditions to correspond to values to standards.
Methods for calibrating a volumetric pipette:
- Make sure you check your pipette accuracy.
- Place a beaker on a balance and make sure the reading says 0 g.
- Place the pipette filler on the pipette, and squeeze everything out (air particles, any water that is present)
- Carefully fill the pipette fully so it is at the bottom of the meniscus line.
- Place the water in the beaker and record the reading.
- Record the temperature of the room 4 (Sydenham Science, 2021).
- Use this equation to figure out the density while temperature affects this – mass x z value, where z value is the conversion factor based on the density of water 5 (SandySecondary Science, 2021).
Methods for calibrating a weighing scale:
- Make sure that your weighing scale works.
- Turn on weighing scale and make sure it is set to “0”.
- Test the weighing scale if it is set by placing an object on top.
- Plot the reading on a graph, to create a calibration curve.
Making of a standard solution
What is a standard solution?
A standard solution requires an accurate known concentration, if the unknown concentration is basic then the standard solution will be acidic and vice versa.
Calibration for pH Probe
- Take your pH probe and make sure it is turned on, allow enough time for the pH metre to warm up. Check the manuals if you’re not sure.
4 Step taken - youtu/oQ1InElYf5s
5 equation taken - youtu/ELyJu-2jZmE
4/24/ BTEC: APPLIED SCIENCE UNIT 2 ASSIGNMENT A Procedure for making a standard solution
As shown on the image above, all the equipment needed for the practical is stated in the image equipment list above.
- Make sure that the balance is set to ‘0’. Measure 2 g of anhydrous sodium carbonate.
- Transfer the anhydrous sodium carbonate to the beaker, make sure you use ionised water to transfer any solids. Dissolve the solid.
- Transfer the standard into a volumetric flask, this must be a 250 ml.
- Add water (just under the meniscus) and mix the solution inside the volumetric flask.
Making a standard solution
- Add the calculation at the beginning, to prove mass needed for the making of the standard solution Risk assessment:
4/24/ BTEC: APPLIED SCIENCE UNIT 2 ASSIGNMENT A Hazard Risk Precaution
Sodium Carbonate Causes serious eye irritation - Wear eye goggles - Avoid contact near eyes Breaking Glassware - Handle carefully. - Do not place on the edge of any tables Electric shock Weighing balance - Be careful when handling the weighing balance. - Make sure you do not touch any expose wires Spilt water Slipping - Do not place any liquids near the edge to avoid spillage. - Clean up any spillages after
Practical 1 [Titration with phenolphthalein]
Equipment list
- Burette
- Deionised water
- Phenolphthalein
- Beaker
- White tile
- Conical flask
- Burette clamp
- Pipette
- Pipette filler
- Hydrochloric acid (HCl)
- Sodium carbonate (Na 2 )
- Clamp stand
Risk assessment:
4/24/ BTEC: APPLIED SCIENCE UNIT 2 ASSIGNMENT A 8. Place the conical flask underneath the burette under the white tile. Slowly open the tap from the burette to let hydrochloric acid to the conical flask, swirl it until it is colourless. 9. Record what you see and time how long the process of the change takes place. 10. Repeat all the steps until you have 2 valid results and a results table.
Practical 1 (Titration with phenolphthalein) – RESULTS
Titration number 1 2 3 4 Start titre (cm 3 ) 0 10 0 10. End titre (cm 3 ) 9 19 10 20. Total titre (cm 3 ) 9 9 10 10. Average titre (cm 3 )
9.
Practical 2 [Titration with pH metre - neutralisation]
Equipment list
- Burette
- Deionised water
- pH metre
- Beaker
- Conical flask
- Burette clamp
- Pipette
- Pipette filler
- Hydrochloric acid (HCl)
- Sodium carbonate (Na 2 CO 3 )
- Clamp stand
Risk assessment:
Hazard Risk Precaution
4/24/ BTEC: APPLIED SCIENCE UNIT 2 ASSIGNMENT A Hydrochloric acid Causes serious eye irritation. Corrosive
- Wear eye goggles
- Avoid contact near eyes Sodium hydroxide irritation - Wear eye goggles
- Avoid contact near eyes.
- Do not place anywhere near your nose.
- Handle gently Glassware May cut skin. - Handle carefully.
- Do not place on the edge of any tables pH probe May cause breakage - Clean up any broken pieces.
Method on titration with pH probe
- Assemble the clamp stand with the burette clamp.
- Clean the burette with deionised water, make sure the bottom tap is closed so no spillages occurs. Make sure that the measurement of the burette is facing you – must be readable.
- Place the burette at the floor and add 50 cm 3 of hydrochloric acid (HCl) (add the acid to a beaker – to make the transferring of the acid much easier and quicker) (add this slowly as it may cause splashes). Make sure that it is below the meniscus area.
- Pour deionised water into a beaker – to clean any acid residue.
- Rinse the pipette with deionised water using the pipette filler by placing it on top and use the wheel on the pipette filler to create a suction. Slowly push it down so the bottom of the pipette is on the beaker. Remove the pipette filler and place your thumb on top of the pipette to create suction.
- Get a new beaker and rinse it with deionised water. Add 25cm 3 Na 2 CO3 to the beaker (make sure the conical is rinsed with deionised water). Transfer the acid from the beaker to the conical flask – be careful with this as it may cause any spillages.
- Place the conical flask under the burette to release 1cm 3 of HCl, swirl the conical flask, then record the pH pf the solution using the pH probe.
- Repeat step 7 until 40cm 3 of titre is released.
- Repeat all the steps again until two of the sets are correspondent.
Practical 2 (Titration with pH metre) – RESULTS
pH probe supplementary results due to an error (teacher material, 2023)
BTEC: APPLIED SCIENCE UNIT 2 ASSIGNMENT A
- 4/24/
- 38 3 3 3 9.
- 39 2 2 2 10.
- 40 2 2 2 10.
4/24/
BTEC: APPLIED SCIENCE UNIT 2 ASSIGNMENT A Titration 2 – pH probe graph
At the equivalence point, the titration is just enough to completely neutralise the analyte solution. The equivalence point in this titration (acid-base titration) shows that moles of base = moles of acid and the solution will only contain salt and water. The equivalence point is 26 cm.
4/24/ BTEC: APPLIED SCIENCE UNIT 2 ASSIGNMENT A Calculations for titrations
proving HCl concentration
Titration - using the phenolphthalein (C₂₀H₁₄O₄) proving HCl concentration.
HCl volume – 9 cm 3
Number of moles: moles = volume/1000 x concentration
25/1000 x 0 = 2 x10⁻³ (0 moles)
Na 2 CO 3 (aq) + 2HCl(aq) —-> 2NaCl(aq) + H 2 O(l) + CO 2 (g)
The ratio of 1:2 for sodium carbonate to hydrochloric acid
0 x 2 = 0 of HCl Concentration of HCl = moles/volume/ 0 .005/9/1000 = 0
The concentration of hydrochloric acid was proven to be 0 M
(should be on conclusion section)
Proving the concentration of NaOH
Mass = !"#$#%&'%(')"*)+&'#$#,&-./(#dm
NaOH + HCl à NaCl + H 2 O
The ratio of 1:1 for sodium hydroxide to hydrochloric acid
HCl volume = 25 cm
HCl concentration = 0 M
NaOH volume = 25 cm 3
Moles of HCl = Concentration x volume
0 x 25 / 1000 = 0 (moles)
Concentration of NaOH=Moles / volume
0 / 25 / 1000 = 0.
The concentration of Sodium Hydroxide was proven to be 0 M
(compare the results with someone else) – Walker
4/24/ BTEC: APPLIED SCIENCE UNIT 2 ASSIGNMENT A
Conclusion
Evaluation
The pH probe was not calibrated properly, this means that it was not calibrated for the pH ranging 10+. This affected the rest of the practical since the pH probe were not set to the right values which meant the results were inaccurate therefore supplementary results were given by the assessor. Other sources of error for the first titration practical were using phenolphthalein, due to not knowing when the colour changing could’ve started, which means that potentially the colours would’ve started changing without the naked eye being able to see it.
There were many ways on improving the titration such as, using a different type of concentration and to do make sure all the practical were done on the same day. On the calibration there could have been residue from the past practical and the water used could have left some residue meaning it could have affected the rest of the practical.
There may have been left over residue in the glassware this means that the results were inaccurate. There are many ways to improve the practical such as rinsing the glassware twice, making sure that when liquid is getting transferred that different glassware is used for different types of liquid.
4/24/ BTEC: APPLIED SCIENCE UNIT 2 ASSIGNMENT A
image 1- shows that incident light = transmitted light 10 - this figure shows us that the incident light is going through the cuvette and the same light transmitted through it is reflected to the other side.
Standards of copper sulphate
The highest concentration that is required is 1M then it follows by 0 M, 0 M, 0 M, and 0 M 11. The concentrations need to be exact so no error will take place while making the exact number of molars for each standard of copper sulphate.
Equipment list
8x cylinders of 10cm 3
4x beaker of 100 cm 3
2 x dropping pipette
Deionised water
Cuvette
Colourimeter
A variation of CuSO 4 in different molar values (0,0,0,0 and 1)
10 Image taken - edinst/blog/the-beer-lambert-law/ 11 Class notes – teacher’s resources
4/24/ BTEC: APPLIED SCIENCE UNIT 2 ASSIGNMENT A Methods for making a standard solution
This image shows the different concentrations of CuSO4, ranging from 1M – 0 M.
Making a standard solution for CuSO 4
The general equation for making different solutions is:
(Volume desired) x (concentration desired) = mass of solute needed
Equipment list
x8 cylinders of 10cm 3
x4 beaker of 100 cm 3
x8 dropping pipette
Deionised water
1M copper sulphate
Pen marker
4/24/ BTEC: APPLIED SCIENCE UNIT 2 ASSIGNMENT A 3. Each time that a new filter is chosen to be tested, make sure that you swap the cuvette with water and press the button indicated “0” for the machine to return to its original value. 4. Use the different filters to make sure that the correct filter is used for this, make sure that there is the least fluctuation for the filter to be able to attain the best results.
Risk assessment
Hazard Risk Precaution
Water Slipping. Clean up any spillages to avoid accidents.
Copper sulphate Toxic and irritation on the skin.
Toxic to aquatic life.
Do not handle the copper sulphate irresponsibly.
Do not pour the solution directly to the sink.
Equipment list
Colorimeter
Cuvette 2x
Deionised water
1M CuSO 4
Rinse the cuvette with deionised water to clean out any residue that is left from any previous experiments. After rinsing the cuvette, set the cuvette in to the slot (make sure that the clear side is placed left – right = this must be the clear side). Press the button which indicates “0” – this must read “0”.
Take another cuvette and rinse it with water. Take the 1 M of CuSO 4 and pour it into the cuvette, make sure this doesn’t overflow. Take the cuvette filled with CuSO 4 and place it on the slot, look at the reading and record what it says.
There are 8 available filters, experiment with each one and record which one has the best results with the less fluctuation. Make sure that the filter is chosen has the highest absorbance. If the filter chosen is wrong this will affect the rest of the results.
Results
4/24/ BTEC: APPLIED SCIENCE UNIT 2 ASSIGNMENT A Filter colour (wavelength in nm) Absorbance
Violet 430 -0.
Blue 470 -0.
Blue – Green 490 -0 (fluctuating)
Green 520 0.
Yellow – Green 550 0 (fluctuating)
Yellow 580 0 (fluctuating)
Orange 600 1.
Red 700 2.26-3 (fluctuating too much)
The wavelength of highest absorbance was the orange filter 600.
Methods for finding different concentration of CuSo4.
Take 4 cuvettes and measure each one with the different concentration of CuSO4. Place the cuvette with water into the reading and press the button “0” so the reading goes to “0”. This step is vital, and this means that if the reading is incorrect, the results may be impacted.
Start with the lowest concentration of CuSO 4 record the absorbance number. Do step 2 until all the concentration have been tested – record each absorbance.
Every time that a new reading is done, the water filled with the cuvette must be placed in the slot and the button with the indication of “0” must be pressed. This sets the colourimeter back to the right setting ready for the next concentration reading of CuSO4.
Each time that a new set of concentration of CuSO 4 needs to be tested, step 3 must be followed. If step 3 is not done – this affects the rest of the results and may not be valid.
After all the reading is collected – this must be recorded in a table alongside an unknown concentration.
Repeat steps 2-5 at least 3x – this is the recommended repeats, so the results are as accurate as possible. Calculate the mean of each result and you must show calculations.
Conclusions
2A titrations - A detailed unit2 assignment a
Subject: Chemistry
Sixth Form (A Levels)
• A2 - A Level