- Information
- AI Chat
0118 Video Health Assessment Success Guide
Health Assessment (NURS 3112)
Western Governors University
Recommended for you


Preview text
Video Health Assessment Success Guide
C349 LJT1 0118
We recommend that you save this document to your computer. Click on the blue hyperlinks for more information on each section.
Review Each Step Resource/Tip Step 1: LJT Introduction Utilize this Success Guide for FAQs & a review of the task. Step 2: LJT Taskstream Directions
- Example Jarvis Video Health Assessment
Use the Physical Assessment Documentation Form (PADF) and Jarvis textbook to review/practice assessment techniques required for this task. You will need to retrieve the fillable PADF form located in Taskstream as a file attachment. Mentally prepare what you will do and say for each area. Contact your Course Instructor with any questions! Step 3: Recorder Download Demo: PC or MAC
Go to WGU site to download recorder: wgu.hosted.panopto Plug in WGU webcam -make <1 min test video to see how it all works. Step 4: Room Setup & Preparation Gather your equipment and print the PADF; make a 2nd test video to check audio, lighting, camera focus, and exam area. Step 5: Starting Your Recording Use the PADF and verbalize your assessment steps. Be sure to have yourself and the patient within the camera’s frame for the entire length of the video. If you make a mistake, correct yourself before the end of the video, or record a second video (both must be uploaded to Taskstream for evaluation - add the addendum video as a "Weblink"). You are an awesome RN & fantastic WGU student; set a goal to record a passing video for your first task submission! Use the resources found in this Success Guide and in your Course of Study! Step 6: How to Complete the PADF Ensure the PADF is complete, accurate, and aligns with your video. Be sure to also include an appropriate analysis of findings. Save the file to your computer so all of your changes can be easily saved prior to uploading to Taskstream! Step 7: How to Upload All Items to Taskstream
Final Checks before Submit 1. Review the LJT1 Rubric again - items A-E must be submitted at same time. 2. Open and check your attachments that you uploaded. Request Originality report -Submit even if 100% match occurs- the evaluators are aware that it is the form matching.
If you are unable to click the boxes or type answers onto the PADF you most likely need to upgrade your Microsoft Office. All WGU students can receive an upgrade to Microsoft Office 365 free which includes Word 2016. Click HERE to get started.
eCare@wgu is available for technical assistance with Panopto. Also see Panopto
“How To” Video Series & Ecare Panopto FAQs -includes iPad, and alternate recording
options
Taskstream screenshots - Required forms are under File Attachments at the end of the Directions.
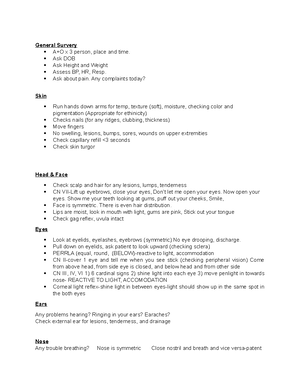
blade or prop, such as a plastic spoon, to depress the tongue & check the uvula/gag
reflex. To measure/document the pupil diameter you can estimate the size in millimeters.
B. Not needed for the video: Snellen chart, otoscope/ophthalmoscope, tuning fork.
Q4: Can I use my child as my client in the video?
A. No. All participants appearing in the video must be over 18 years old to legally sign
the consent form.
Q5: Can I use a clipboard or note cards while doing my video?
A. You may have a clipboard or note cards to assist you; however we want to see that
you know this material and how to perform the assessment. Do not read off the cards the entire
time; use them for assessments you often forget or find difficult. The PADF form is the best
guide to keep on your clipboard and follow the order on that form as closely as possible.
Q6: I don’t know how to perform some of these assessments. What do I do be better
prepare myself for this video?
A. Review Module 5 “The Complete Health Assessment” -> Adult Head-to-Toe
Assessment video & Jarvis Ch 27 eText are your best resources to review all of the techniques
on the PADF form. You can also review the system-specific materials in Modules 2 - 5.
Q7: Does my patient need to take his/her shirt off for the Respiratory and Cardiac exam?
A. No, it’s recommended your patient wear a tank top/t-shirt and shorts, and be barefoot
for lower extremity assessment. All assessments can all be performed over the clothes. Be sure
to thoroughly review the formal LJT1 instructions in Taskstream.
Q8: Do I need to do a pelvic or breast exam?
A. No, breast or genital/rectal exam is not on the PADF form.
Q9: Do I need to do a full set of vital signs? What if I don’t have a BP cuff?
T - you DO NOT need to take your patient’s temperature. It is not called for on the PADF form.
P - take a radial pulse for 30 seconds and multiply x 2.
R - count for 30 seconds and multiply x 2 (be sure you verbalize you’re checking this, as it can
sometimes be difficult to know you’re inspecting the chest for the respiratory rate).
BP - it’s OK if you don’t have a manual or automatic cuff. You can use a prop (a folded kitchen
towel, a wide sock). And explain what you are doing, i. “I am using a prop for my blood
pressure cuff; I will wrap the cuff (prop) around the patient’s arm and pump up the cuff,
releasing slowly while listening through my stethoscope (in place) and note the patient’s blood
pressure.” You will document on your PADF that a prop was used and that a B/P reading was
not obtained.
Pain – You must ask your patient if they are having pain, and if so, they should rate it on a 0-
scale. This is part of the required VS for this task.
Success tip! For best guidance on using the Panopto Recorder spend some time viewing this
great resource: Panopto "How-To" Video Series. Many students have the button “Capture
Computer Audio” checked and this is causing their video to have no audio. Ensure
“Capture Computer Audio” is “Unchecked” and that your WGU webcam is selected for
Video and Audio.
Q10: Can I pause the recording?
A. No, you should not pause or stop the recording, as the risk is high of not getting it
started again. If you hit “Stop” you are done and cannot continue recording. This should be a
seamless recording; however if you need to pause your assessment to collect your thoughts or
remember what to do next, that is ok. If you accidentally stop your video, you can make two
video parts and submit two URLs. For assistance with any Panopto related technical issues,
contact ecare at ecare@wgu
Success tip! - If you laugh, a phone rings, dog barks, etc.--keep recording -- interesting
things sometimes happen!
Q11: What if I realize I forgot something?
A. If you go through the assessment and forget something, you can either perform it at
the end of the video or, if you have not yet submitted, film an addendum video and attach both
links when you submit via Taskstream. If you have already submitted, addendum videos are not
allowed. You must rerecord an entire, full-length assessment once the task has been evaluated.
Q12: What items are required to be uploaded into Taskstream?
A. Here is the list of required items to be uploaded into Taskstream. All items must be
submitted at the same time or your task will be returned as incomplete without evaluation!
● One consent form for your volunteer patient (remember, they must be able to provide
consent in your home state & be at least 18 years old). Their signature MUST BE
HANDWRITTEN. All blanks must be complete. Use full mailing address with city,
state, and zip.
● URL of your Panopto video (Viewer Link) in the correct DropBox Folder. Your video
URL link will be emailed to you by Panopto to your WGU email.
● Completed Physical Assessment Documentation Form (PADF) with all boxes addressed -
don’t leave any blanks spaces. If it is an item you forgot to assess in the video, you can
simply write “not assessed” in the documentation box next to it. Analysis of Findings
paragraph on last page. Sources are not necessary for this task; however, if you do use a
source for any reason, you must reference and cite it properly according to APA
standards.
Any revisions submitted must contain all items as if the submission was brand new
(a new consent, new & complete PADF, and a new, full-length video).
Q13: How do I submit the consent form for this course?
A. You will need to print the form, fill it out completely, and have your patient sign it
performed correctly. Addendum videos containing only the items you missed are not allowed as
resubmissions. When you resubmit, all items must be submitted to Taskstream- including a new
patient consent, a complete PADF & analysis that matches your new video, and a full-length
Panopto video URL.
Step 1: LJT Introduction
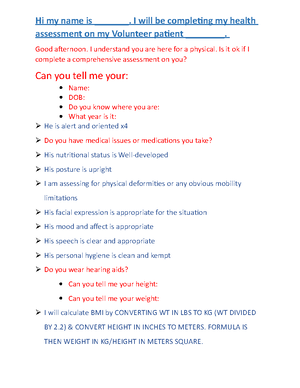
Hi, and welcome to the introduction for your C349 LJT 0118 Video Health Assessment. First off, we want you to know that you can do it, and your Course Instructors are here to help! For this task, you will be recording a video of yourself completing a head-to-toe assessment on a volunteer in your home. You do not have to memorize the entire order of the assessment, nor do you have to collect a health history for this task. We also want you to know that almost everyone is nervous to start this task! However, after completing the task, most students state they wish they hadn’t put it off, and they actually found it much easier than expected. So now, let’s take a closer look at our video health assessment checklist. Once you open this Success Guide, we encourage you to save a copy to your computer in order to give you easy access. The first step in the process is to review our informative success and FAQ guide. Here you will find some great answers to common questions, as well as success tips. You will want to read through all the information and know it’s available for you when questions arise. After reading the FAQs, make sure to also go through each of the Steps at the top of the Success Guide. Don’t forget – your Course Instructors are here to help! Please reach out with any questions or issues. YOU CAN DO IT!
Step 2: LJT Taskstream Directions
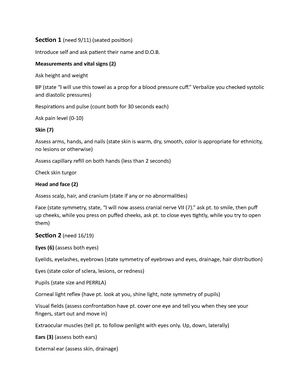
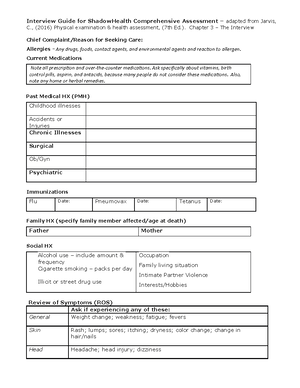
Step 2 on the Success Guide is highly important for understanding the directions and objectives for your video recording. From your C349 course, click on the center assessments tab and go into Taskstream. Here, you should see the 0118 version of the LJT video health assessment course. You should have a big yellow button to take you into Taskstream, and then you will land on the video health assessment page. Please ensure it shows you in the 0118 version. On the left side, you should click LJT1 to expand the directions, and they will populate in the center of your screen. Read through this information carefully, as the directions are very specific as to what you need to do for this task. Underneath the directions, you will find requirements, listed as letters, which will refer to various items included in your task. Item A is the patient consent, titled as “Nursing Program Audio/Video Recording Consent and Release Agreement (Patient).” Item B has two parts. B1 includes the video health assessment, which must obtain a score of at least 51 points. Part B2 is the functional Panopto URL for your video. Item C is the Physical Assessment Documentation Form, which you may see abbreviated as PADF throughout certain resources. This must be completely and appropriately filled out when you submit it. Item D is the analysis of your assessment findings. There is a place to type this at the end of the PADF. Item E is sources, which are not required for this task. However, if you do use sources for any reason, they should be referenced and cited appropriately per APA standards. Item F is articulation and professional communication. Your written word should be appropriate with minimal errors. Below the requirements, you will see a file attachment section. This includes attachments you will need to be successful in this task. You can download each of these files and save them directly to your computer. This will allow you to edit and print them more easily. Remember, the patient consent is a legal document that must be complete when submitted, and it must have a handwritten signature. The second attachment is the PADF which you will need to complete your documentation on after recording your assessment. This lists all of the assessments you should perform during your video recording. If you are unsure of how to perform any of the required assessments, you should review your Jarvis textbook. Techniques must be performed correctly or points will not be awarded. The 0118 video assessment requires 63 techniques. In order to meet competency on the video aspect, you must correctly perform at least 51 techniques. Remember to verbalize items as you perform them, especially for things that require inspection. Otherwise, it may not be clear to the evaluator what you are checking or doing. For example, when assessing skin color/pigmentation, you should verbally state this so that it is clear what is being observed. Prior to recording your assessment, review the entire PADF and what assessments are required, go through your Jarvis book for any technique you may
and free text spaces in various parts. Click through and select your appropriate assessment findings for each area. Your form documentation should match your video assessment. For example, if you used a prop for blood pressure, you should write “prop used – actual BP not taken” on the right hand column. If you have an abnormal finding, such as a lesion on the skin, you would document that appropriately and provide any additional information in the right hand column. If you forgot to assess something during the assessment, simply write “not assessed” in the right hand column. Documenting something you did not assess is considered falsifying documentation. At the bottom of the PADF is an area for documenting the analysis of findings. This should be about a paragraph long and will be similar to how you would provide report to another nurse. Even if your patient has normal findings, you should still include an analysis. You could provide items such as the BP or other vital signs, BMI, denial of pain (or pain scale if they state they are having pain), and an overall summary of some of the assessment techniques you performed. If you did find something abnormal during the assessment, that should also be part of your analysis, and a more in-depth description of the abnormality can be dictated her. Based on their age or other factors, you may also state your recommendation for follow-up with a specialist, their PCP, dentist, or other healthcare related needs. References are not required for the 0118 LJT task. However, if you for some reason decide to use a reference, you must cite it appropriately and include a reference list at the bottom of the PADF. Any references used would need to follow APA format. Be sure you save your completed checklist to your computer in order to upload it to Taskstream as an attachment.
Step 7: Uploading Your Items to Taskstream
Congrats on completing your video recording and PADF! Now it’s time to upload everything to Taskstream so it can be evaluated. The files you will need to upload include the fully complete and legible patient consent with a handwritten signature, the viewer link for a Panopto recording, and a completely filled out PADF with analysis of findings. Panopto will send you an email when your video has finished processing that will include the viewer link. For directions uploading your files to Taskstream, please review these instructions. If you face any difficulties uploading your files, you can review the FAQs for Taskstream issues. To upload your Panopto video URL to Taskstream, please review these helpful instructions. After attaching the Panopto link(s), ensure all items are present and attached. Go to the Scores Results tab and request your originality report, which may take up to 10 minutes. The PADF will be the only item that needs to be analyzed. Your PADF will have a high match due to it being a form template. However, your analysis of findings should be unique. After you review this, you can return to your files, review the attachments one more time before submitting, and hit the Submit Work button. Your work will then be sent into the queue to wait for evaluation. If you have any difficulties uploading your items, reach out to your Course Instructor or E-Care. Your submission will likely be evaluated within 2-3 days. If your video does not pass, you will need to rerecord a full-length video with all assessment techniques and submit the new Panopto link along with a new patient consent and new PADF/analysis. Congratulations on submitting your LJT video health assessment!
0118 Video Health Assessment Success Guide
Course: Health Assessment (NURS 3112)
University: Western Governors University


- Discover more from: