- Information
- AI Chat
Cursive Step 1 - Peterson Directed Handwriting ( PDFDrive )
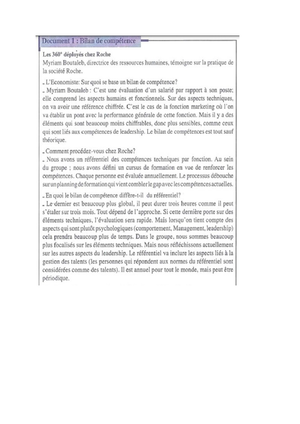
Ressources Humaines
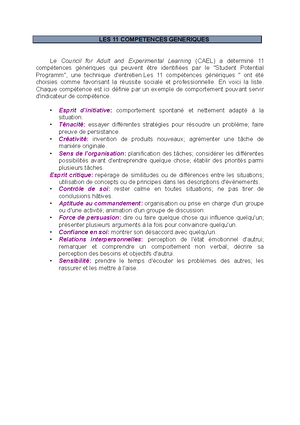
Université Internationale de Casablanca

Preview text
Copyright © 2010 Rand H. Nelson, Peterson Directed Handwriting
‰ÄÖûÅîë
ÃáŸÆ§ÆßáôÖ ̃åïë P
e t e r s o n D i r e c t e d H a n d w r it i n g G r e e n s b u r g , P e n n s y l v a n i a Since ISBN 1-890666-38-6 1908
Organization And Procedure Table of Contents Print the "LEARN" page to teach the movements. Teach the child how to hold the page in writing position. Show the start point, stroke movements and teach the action words. Teach the child how to finger-trace the model while chanting the words to learn where to start, which way to go and how to move with the rhythm of the vocal. Repeat the finger-trace exercise until the child is moving smoothly with the voice. Move to your tablet for Write & Say practice. Flu- ency is smoothness. When smooth movements are learned, execution at various speeds becomes possible. As language and spelling skills grow ap- plication speed can increase. The limiting factor is control. Regular, rhythmic practice will allow im- provement of control for better legibility later on. In addition to background instruction, this book of- fers two types of pages for use with your student. The "PRACTICE" section comes first to minimize scrolling for page selection in PDF By Hand. Use the Table of Contents below to quickly find the page number for a practice page. The directory tree opens for page selection when you click on the plus sign. 1. Cover 2. Organization And Procedure 2. Table Of Contents 3. Instructions And Background 6. Practice Exercise 1 7. Practice Exercise 2 & 3 8. Unlined, Practice/Fluency Test 9. Lined Large 10. Lined Regular 11. Practice Sharp Top 12. Practice Loop Top 13. Practice Round and Roll Tops 14. Practice A, a 15. Practice B, b 16. Practice C, c 17. Practice D, d 18. Practice E, e 19. Practice F, f 20. Practice G, g 21. Practice H, h 22. Practice I, i 23. Practice J, j 24. Practice K, k 25. Practice L, l 26. Practice M, m 27. Practice N, n 28. Practice O, o 29. Practice P, p 30. Practice Q, q 31. Practice R, r 32. Practice S, s 33. Practice T, t 34. Practice U, u 35. Practice V, v 36. Practice W, w 37. Practice X, x 38. Practice Y, y 39. Practice Z, z 40. Practice 0, 1 41. Practice 2, 3 42. Practice 4, 5 43. Practice 6, 44. Practice 8, 9 45. Learn Exercise 1 46. Learn Exercise 2 and 3 47. Learn 4 Basic Strokes 48. Learn A, a 49. Learn B, b 50. Learn C, c 51. Learn D, d 52. Learn E, e 53. Learn F, f 54. Learn G, g 55. Learn H, h 56. Learn I, i 57. Learn J, j 58. Learn K, k 59. Learn L, l 60. Learn M, m 61. Learn N, n 62. Learn O, o 63. Learn P, p 64. Learn Q, q 65. Learn R, r 66. Learn S, s 67. Learn T, t 68 Learn U, u 69. Learn V, v 70. Learn W, w 71. Learn X, x 72. Learn Y, y 73. Learn Z, z 74. Learn 0, 1 75. Learn 2, 3 76. Learn 4, 5 77. Learn 6, 7 78. Learn 8, 9 79. Cursive Background 80. Types of Lessons 81. More About Fluency
4 These pages are designed for a learning activity called “finger-tracing." Finger-tracing will allow the child to record in muscle memory, gross movement sequence and rhythm information. Demonstrate First (Illustrate and Describe) - Touch your pointer finger to the start point. - Say the “action words” aloud as you trace the strokes with your finger. - Repeat the demonstration several times. Our Animated Letter Cards are useful for this demonstration also. Make the Voice-To-Movement Connection - Air Writing - Teach the child how to move with voice by writing in the air. The Animated Letter Card is a great tool for this activity. Repeat until everyone is moving together. Now help the child to do the finger-tracing. - Teach the child how to rotate the page into “writing position” and hold the page at the top with the paper-holding hand so that the writing arm can be under the image. - Direct the finger-trace activity by chanting the words aloud with the pupil. - Repeat the finger-trace several times. Chant slowly at first, and increase the rate a little at a time as the child establishes some rhythm. For multi-stroke letters, pace the chant to emphasize the control points within the form. Write & Say - Replace the movement-model page with a sheet of unlined paper or move to the chalkboard. Please remember we are working to develop gross motor patterns. - Emphasize that the goal is to move the pencil or chalk with voice as the action words are chanted. We will write four with our voice and pick the one we like best. - Direct the activity by chanting along with the child. To start the action and keep it going, you can use the commands, “Touch. Say it.” - If the result is too far removed from the goal, repeat the finger-trace step and then try again. If the initial product is recognizable, choose the best and try again to make four more that are just as good or better. Note: All of us begin to guide the pencil with the eyes. We call this “drawing movement.” When the voice shuts off, the child is drawing instead of writing. Drawing movement is visually guided and cannot be rhythmic. The child is unable to chant as a result. The initial hurdle is to elicit writing movement. It can be rhythmic which allows the chant. When the child has trouble vocalizing as the pencil moves, repeat the air-writing and finger-trace steps. Move back to the paper and try again. It is often helpful to try with the eyes closed. The voice will work, but the image produced may not be very accurate. The muscle memory needs practice to learn how to “drive” the pencil. When the pencil is moving with voice to create the strokes, you know that the muscle memory has internalized the movements. He or she will no longer need to look at a model to create an example of the letter on the page. We can now begin to do some critical thinking by using the model to compare for accuracy and to set goals for improved legibility. Introducing Lines When the child is able to “Write & Say” fairly consistent iterations of the target letter on unlined paper or the chalkboard, you can introduce the page with models on lines. Repeat the teaching steps above. During the finger-trace exercise, the child will be learning how to use the lines as targets for movements. You can then move to a ruled practice sheet
5 for write & say practice. Expect that this new challenge will produce mixed results at first. The child may not be able to hit the target lines accurately until practice allows control to improve. Please continue to direct practice exercises. Independent practice will usually be drawing movement and practice of old position habits as well. Writing Size You will find on the last few pages, several masters for ruled practice paper offering different amounts of space between the lines. As consistency and control are achieved at the “large size,” move to the next smaller ruling to begin the size reduction effort. The large-size ruling won’t be practical for practice of four or five letter words due to the laterality of cursive. We recommend a focus on mastery of lowercase forms first. In addition, we also recommend a sequence based upon movement and control points. The fluent kind of movement is goal-oriented. The end-point of each letter is emphasized as a control point for the joining stroke that controls form, slant, size and spacing for the next letter in a word. Eighteen of the lowercase letters end on the baseline when writing a word. We recommend that these letters be mastered first. Four letters end above the baseline when writing words and four tail letters end below the baseline. These forms will require more practice and careful process instruction for pupil understanding of the joining control process. ‰ÄáìÅîÑïÇñÇòáôÇõÇúÖùÖû áƒÅ£Æ§ÆßáêáŸÖ ̈ë Numerous words are possible with these eighteen letters and we recommend moving to word practice as soon as the letters have been developed. ‰üÿàé ̃ç ́í ºöˆóØ¥ØÛÏ Correlation Your language/reading program may demand writing far sooner than your students can master the forms or develop control of the joining process. Because this is so often the case, we recommend a correlation technique called “cursive print.” Since the student builds words one letter at a time at first, the cursive print technique allows independent application of the correct rhythmic sequence and also good joining-control. When the pupil learns how to do this correctly, he or she will simply forget to lift between letters as word patterns are established by directed joining practice activities. ºôáêë ãúÑïáêë ‰üÿñë ãàçŸáêë ‰ü„ ̃åïÖûë When you see this: bºŸáêë you have identified a correctable misunderstanding that would cause trouble every time the student wanted to use the letter "b" in a word.
7 Go Go Stop Stop Practice Exercise 2 & 3
8 Cursive ABC'S and 123'S by Peterson Directed Handwriting Unlined Practice Timed Writing Fluency Test (20 seconds)
- Peterson Directed Handwriting
Peterson Directed Handwriting 11 Write and say, "Sharp Top."
Peterson Directed Handwriting 13 Round Top Roll Top
Peterson Directed Handwriting 14
- Roll Top
- Sharp Top
- Roll Top
- Sharp Top Space
- Curve Down
- Sharp Top Finish or Join Learn to use lines. Write & Say
Peterson Directed Handwriting 16 1. Down 2. Loop Around Rock, Hook Slant Rock, Hook Slant Space Learn to use lines. Write & Say Slide to Join or Finish
Peterson Directed Handwriting 17 1 Twist Down 2. Loop Twist 3. Rock Swing
- Roll Top
- Sharp Top
- Roll Top
- Sharp Top Space Learn to use lines. Write & Say
Peterson Directed Handwriting 19
- Loop Tail
- Rock
- Loop Tail
- Rock Space
- Twist Down Rock
- Rock Hook Learn to use lines. Write & Say
- Loop Twist Never Join
Peterson Directed Handwriting 20 1. Roll Top 2. Sharp Tail Roll to Finish
- Rock, Loop Rock
- Slant Curve
- Rock
- Roll Top
- Sharp Tail Learn to use lines. Write & Say
Cursive Step 1 - Peterson Directed Handwriting ( PDFDrive )
Course: Ressources Humaines
University: Université Internationale de Casablanca


- Discover more from: